This post may contain affiliate links. Please read our policy page.
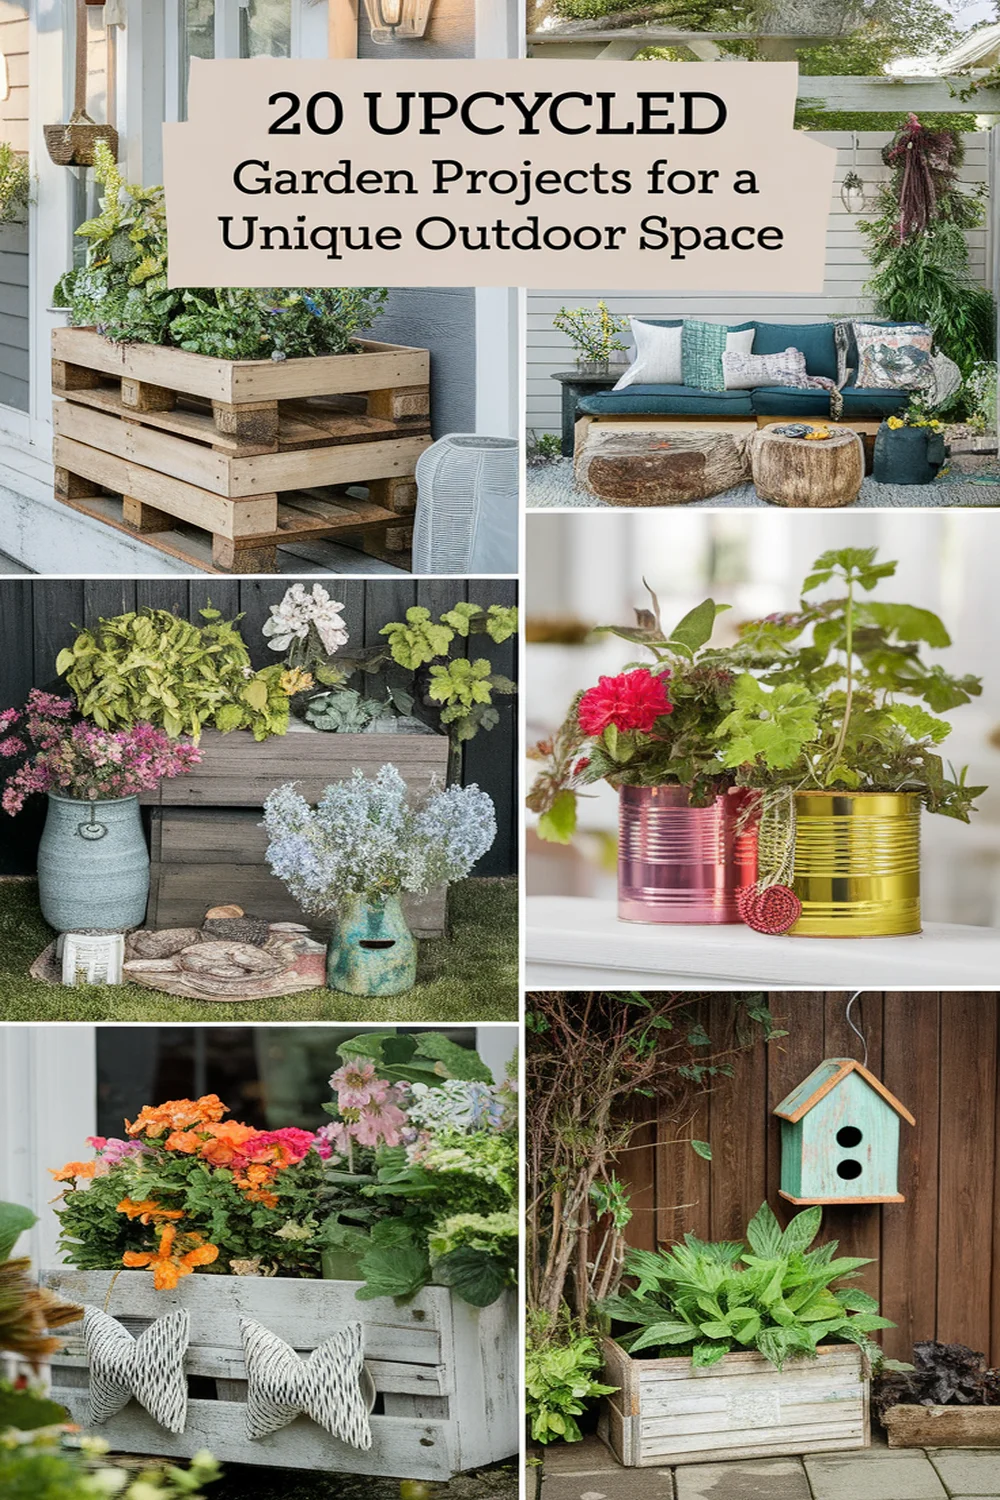
You can create a unique outdoor space with upcycled garden projects that showcase your creativity and sustainability. Transform wooden pallets into vibrant planters, turn old tires into colorful flower beds, or make bird feeders from glass bottles. Vintage furniture works great as seating or plant displays, while tin cans can house your favorite herbs. These fun ideas not only enhance your garden’s charm but also keep waste out of landfills. Discover even more inspiring projects ahead!
Repurposed Wooden Pallet Planter
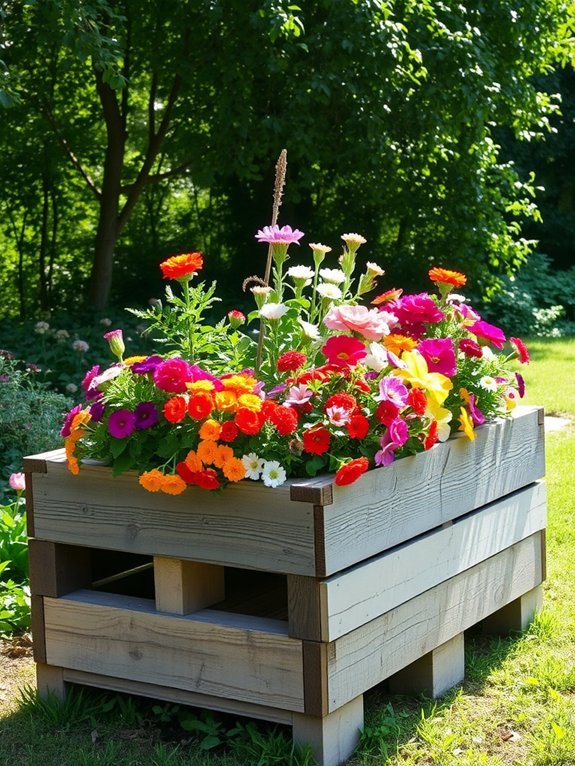
Transforming an ordinary wooden pallet into a vibrant planter can breathe new life into your garden. Begin by choosing a clean, sturdy pallet—preferably one without chemicals. Lay it flat and secure any loose boards. Next, position the pallet vertically against a wall or fence, or create a freestanding design. To add planting space, fill the slats with landscaping fabric, ensuring soil stays in place while allowing drainage. Once the fabric’s in, fill it with potting soil and choose your favorite flowers or herbs to plant. Water them regularly, and watch your repurposed pallet become a stunning focal point. Not only will this project enhance your garden’s aesthetics, but it’s also an eco-friendly way to recycle materials creatively.
DIY Tire Garden Flower Bed

Creating a DIY tire garden flower bed can add a unique touch to your outdoor space while repurposing old tires that might otherwise end up in a landfill. Here’s how you can transform those tires into a vibrant garden feature:
- Choose Your Locations: Pick sunny spots in your yard where flowers can thrive.
- Prepare the Tires: Clean the tires thoroughly and cut them if desired for shape.
- Fill with Soil: Layer the bottom with gravel for drainage, then fill with nutrient-rich soil.
- Plant Wisely: Select flowers that suit your climate, and arrange them for an attractive layout.
Recommended Items
Here are our recommended products and equipment to enhance your upcycled garden projects—feel free to explore!
Upcycled Glass Bottle Bird Feeder
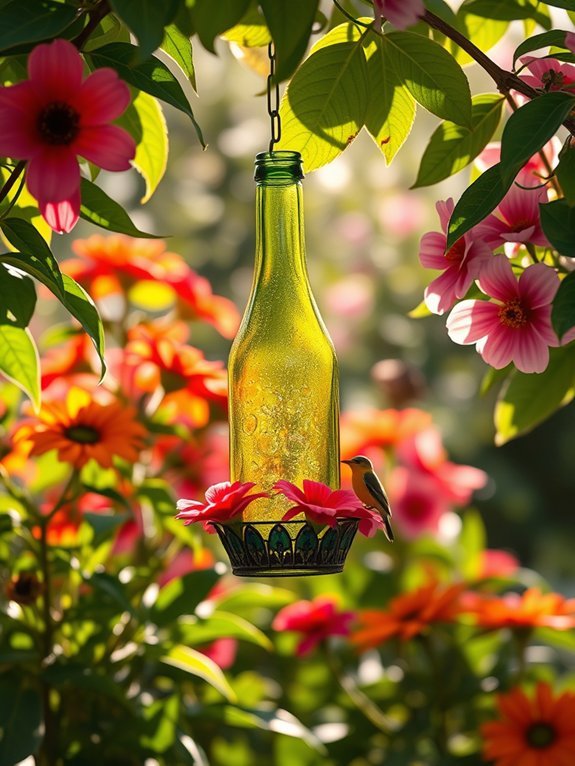
If you’re looking for a fun and eco-friendly way to attract birds to your garden, upcycling glass bottles into bird feeders is a fantastic project. Start by cleaning and removing any labels from your bottles. Next, you’ll need a sturdy base: you can use a wood plank or an old plate to catch seeds. Drill a few holes in the bottle’s bottom and attach it to your base using strong adhesive or screws. Fill the bottle with birdseed and secure a hanging device at the bottle’s neck. Position your new feeder in a visible, sheltered spot, and watch as colorful birds come to dine! This simple project not only nourishes wildlife but also adds a touch of creativity to your garden.
Vintage Ladder Plant Display
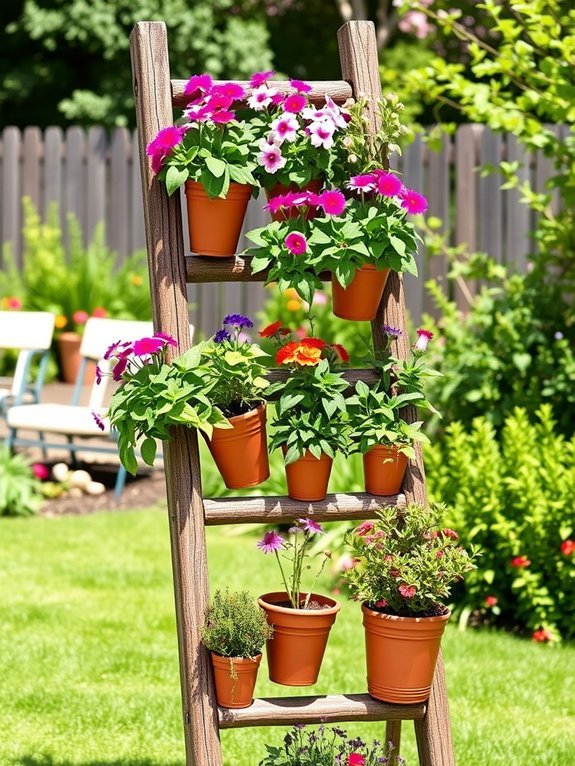
A vintage ladder can become a charming focal point in your garden by repurposing it as a plant display. You’ll not only add character to your outdoor space, but you’ll also create an attractive way to showcase your plants. Here’s how to get started:
- Select Your Ladder: Find a sturdy, aged ladder that fits your style.
- Clean It Up: Remove any dirt or loose paint to guarantee it’s safe for plants.
- Choose Your Plants: Opt for a variety of trailing and upright plants that thrive in your climate.
- Arrange Creatively: Stack pots at different levels on the ladder rungs for visual interest.
With a little creativity, your vintage ladder can transform into a unique garden display!
Old Wheelbarrow Garden Planter
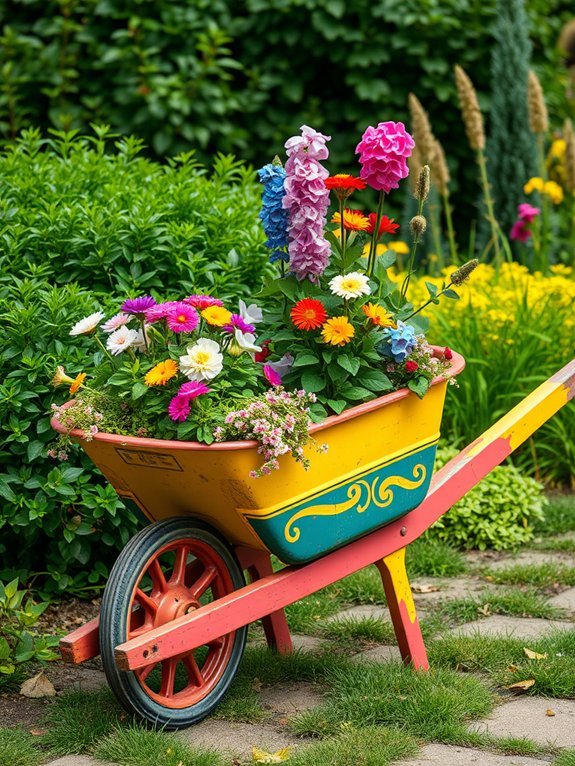
Repurposing old garden tools can breathe new life into your outdoor space, and an old wheelbarrow makes a fantastic planter. To create your wheelbarrow garden, first verify it’s clean and free of rust. If needed, apply a fresh coat of paint for a pop of color. Next, fill the wheelbarrow with soil, leaving a few inches at the top. Choose your plants—herbs, annuals, or perennials work wonderfully—and arrange them to your liking. Make certain to water them regularly and place the planter in a sunny spot for ideal growth. This rustic planter not only adds charm but also serves as an eye-catching focal point. Enjoy nurturing your plants in a unique, upcycled way!
Hanging Gutter Herb Garden

Transforming old gutters into a hanging herb garden not only saves you money but also maximizes your growing space. This creative project lets you easily grow fresh herbs right at home. Here’s how to get started:
- Gather Materials: Find some old gutters, brackets, and screws. Don’t forget potting soil and your favorite herb seedlings!
- Clean and Prepare: Rinse the gutters thoroughly, ensuring there’s no debris left. Drill holes for drainage in the bottom.
- Mount the Gutters: Securely attach the gutters to a wall or fence using brackets, positioning them at various heights for an attractive display.
- Plant and Enjoy: Fill with soil, plant your herbs, and watch them flourish while adding flavor to your meals!
Step-by-Step Guide to Upcycled Garden Projects
Mason Jar Outdoor Lanterns
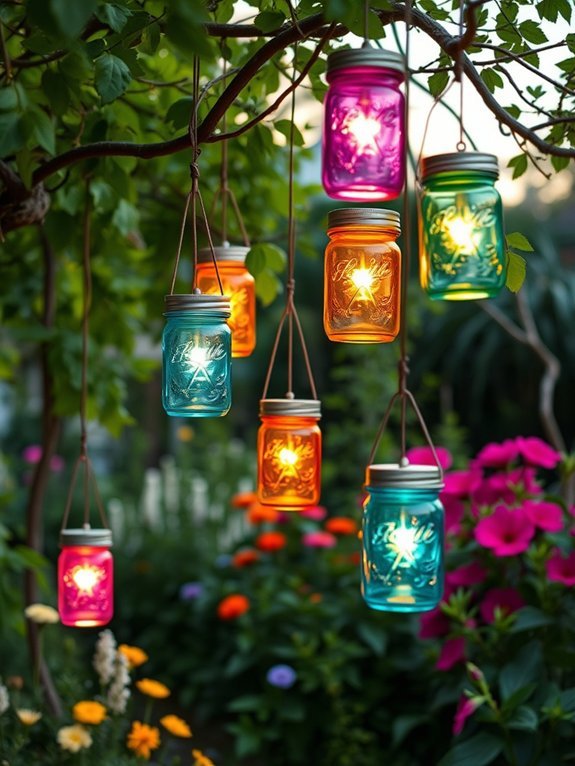
Creating a cozy outdoor ambiance doesn’t have to be expensive or complicated. Mason jar outdoor lanterns are a perfect solution to light up your evenings while adding charm to your garden. Start by gathering some clean, empty mason jars. You can fill them with fairy lights, or use candles for that warm flickering glow. To hang them, simply attach wire handles or place them on tables for a rustic touch. If you want a bit of flair, go ahead and paint the outside of the jars or tie twine around the necks. These lanterns are not just functional; they’re a beautiful way to repurpose materials and enhance your outdoor space, creating a delightful gathering spot for friends and family.
Tea Cup Garden Markers
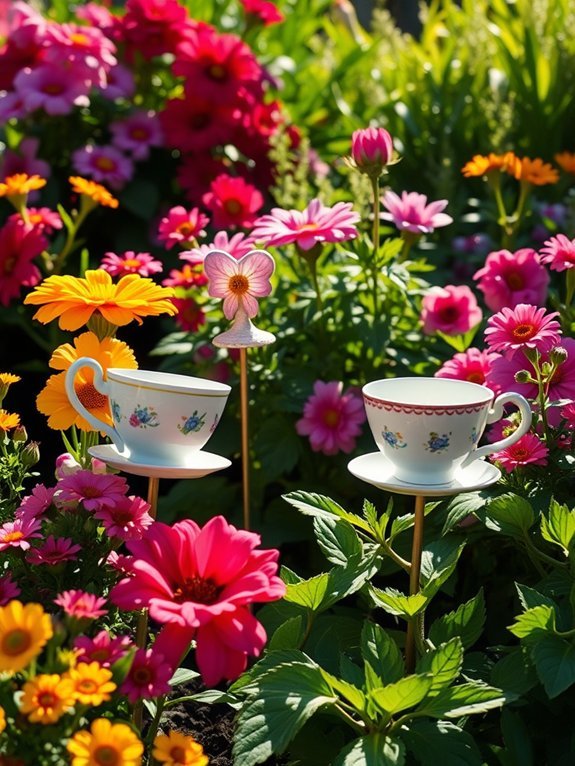
Tea cup garden markers add a whimsical touch to your garden while helping you keep track of your plants. You can turn mismatched or chipped tea cups into unique markers that not only look great but also serve a practical purpose. Here’s how to get started:
- Choose your cups: Pick out colorful or patterned tea cups that catch your eye.
- Labeling: Use waterproof paint or permanent markers to write the plant names on the cups.
- Add a rod: Attach a wooden dowel or a stick to each cup for easy insertion into the soil.
- Positioning: Place your tea cup markers right next to the corresponding plants to enhance your garden’s charm and organization.
Get creative while you plant!
Wooden Crate Vertical Planter
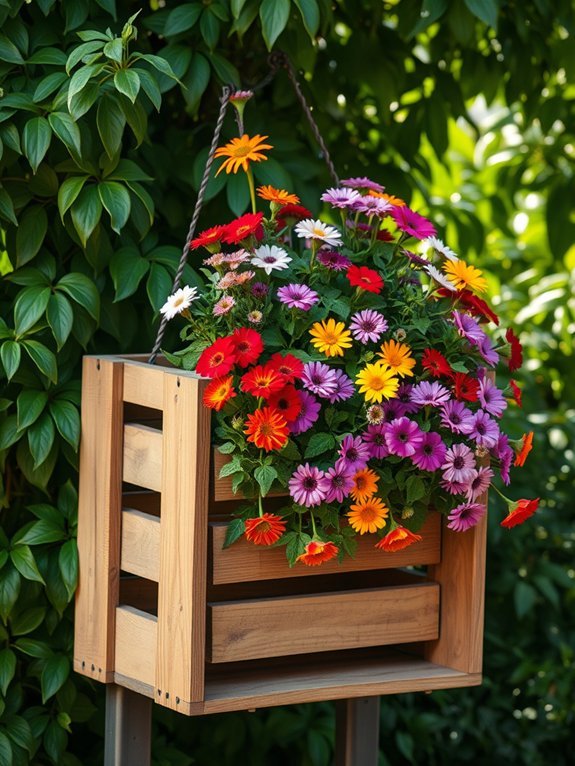
Wooden crates can be your secret weapon for maximizing garden space while adding rustic charm to your outdoor area. Transforming these crates into vertical planters is both practical and fun. Start by stacking a few crates vertically, securing them together if needed. Fill each crate with potting soil and choose your favorite plants, herbs, or flowers for a stunning display. You’ll not only save space but also create easy access for maintenance. To enhance drainage, drill holes in the bottom of the crates, ensuring your plants thrive. You can even paint or stain the crates to match your style. This upcycled project is perfect for small yards or patios, inviting nature into your space with creativity and personality.
Bicycle Wheel Garden Trellis
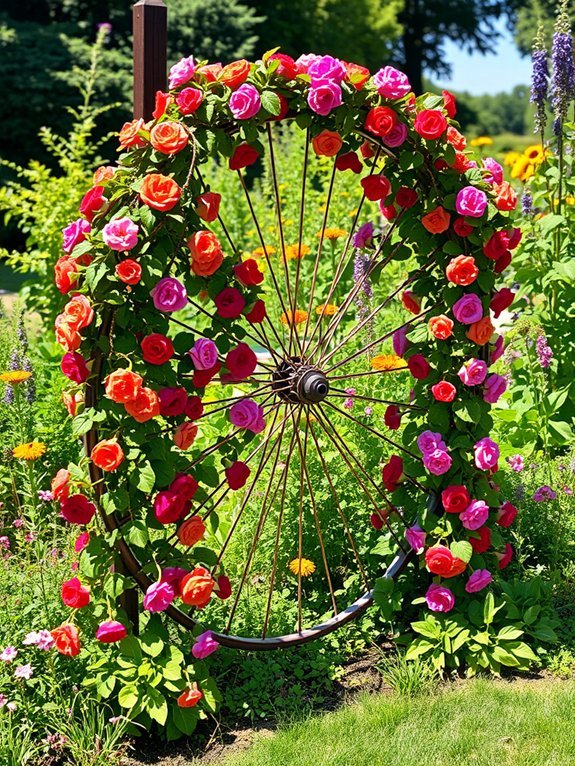
Bicycle wheels can bring a whimsical twist to your garden while serving a functional purpose as a trellis. It’s a creative way to upcycle, and you can easily create a stunning focal point. Here’s how to make your own bicycle wheel garden trellis:
- Select your wheel: Choose a wheel that suits your garden size—mountain bike wheels work great.
- Prepare the base: Securely attach a tall stake or build a frame to hold the wheel in place.
- Affix the wheel: Use zip ties or wire to attach the wheel to your support structure firmly.
- Plant joy: Climb-loving plants like peas or morning glories can be guided up the spokes, adding beauty and function.
Your garden will love the boost!
Painted Cinder Block Planters

After adding some whimsy to your garden with a bicycle wheel trellis, consider using painted cinder block planters to create a vibrant and functional garden space. These planters are easy to customize, allowing you to express your style. You can paint them in bright colors or subtle pastels to match your garden’s aesthetic. Use them for herbs, flowers, or even vegetables.
Here’s a quick reference table to help you decide what to plant:
| Plant Type | Light Requirement | Soil Preference |
|---|---|---|
| Herbs | Full Sun | Well-drained |
| Flowers | Partial Shade | Fertile |
| Vegetables | Full Sun | Loamy |
| Succulents | Full Sun | Sandy |
Wine Bottle Garden Borders

If you’re looking for a creative way to define your garden space, wine bottle garden borders can provide both functionality and charm. Not only do they recycle bottles, but they also add a unique aesthetic to your yard. Here’s how to create your own:
- Collect enough wine bottles in your desired color.
- Clean them thoroughly to remove any labels or residue.
- Bury the bottles neck-down in a trench, ensuring they’re stable and slightly exposed for a visually appealing effect.
- Fill the area around the bottles with soil or mulch to finish the look.
With a little effort, you’ll turn those empty bottles into a stunning border, enhancing the beauty of your outdoor space while helping the environment.
Old Doors Garden Gate
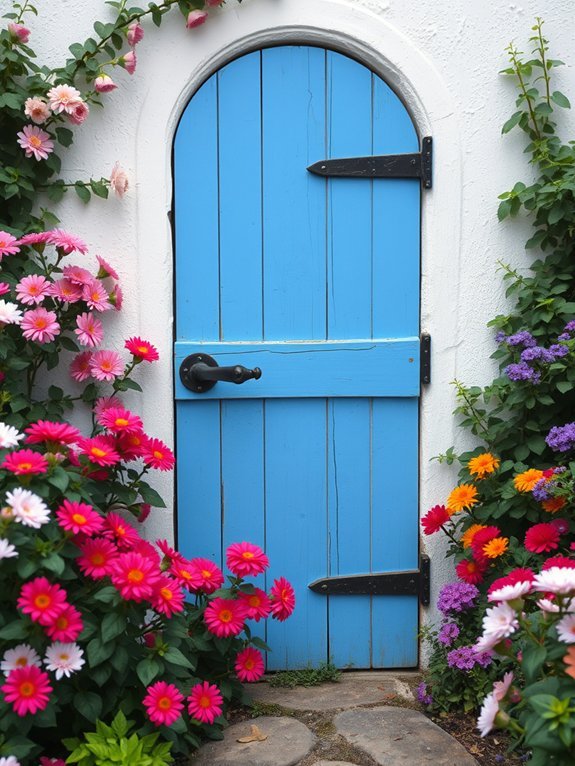
An old door can transform your garden into a charming entryway that’s both functional and stylish. Repurposing a door as a garden gate not only adds a unique touch but also showcases your creativity. You can paint it your favorite color or leave it in its rustic state for a vintage look. To install, simply attach hinges to one side of the door and secure it to sturdy posts. Don’t forget to add a latch or handle for easy access. Enhance its appeal by surrounding the gate with climbing plants or decorative elements like stepping stones. This project isn’t just practical; it’s an eye-catching focal point that invites visitors to explore your beautiful outdoor space. Happy upcycling!
Plastic Bottle Self-Watering Planter
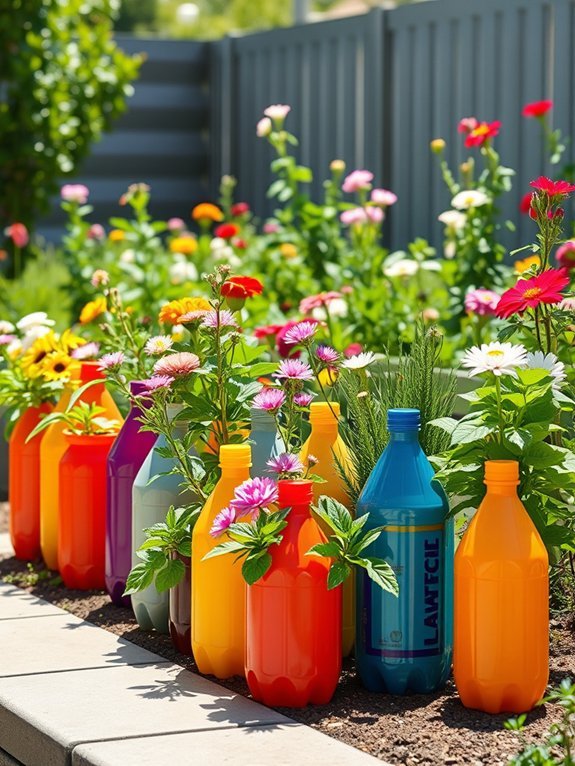
Creating a self-watering planter from a plastic bottle not only saves you money but also promotes sustainable gardening practices. Here’s how to do it:
- Choose Your Bottle: Find a clean, empty plastic bottle (1-2 liters works best).
- Cut the Bottle: Use scissors to cut the bottle in half. Keep the top part with the lid for the watering system.
- Insert Wicking Material: Thread a strip of cotton fabric through the lid’s hole, ensuring one end is inside the top half and the other hangs into the bottom half.
- Assemble and Fill: Place the top half upside down inside the bottom half, fill it with soil, and add your plants. Add water to the bottom, and let the wicking do its job!
Recycled Pallet Garden Bench
Transforming old pallets into a garden bench not only adds a practical seating area to your outdoor space but also exemplifies creativity in upcycling. To create your bench, start by selecting sturdy pallets—ideally, those in good condition. Stack two pallets for the seat and use others for the backrest. Secure everything with wood screws for stability. Sand down any rough edges to guarantee comfort and safety. You can leave the natural wood finish for a rustic look or paint it to match your garden’s theme. Don’t forget to add comfortable cushions for seating. This project not only makes a striking statement but also reflects your commitment to sustainability and creativity in your outdoor oasis. Enjoy your new favorite spot!
Shower Caddy Herb Holder
A shower caddy isn’t just for your shampoo and soap; it can easily become a stylish and functional holder for your favorite herbs too. Transforming this everyday item into a garden accessory is simple, and it adds a unique touch to your outdoor space. Here’s how you can do it:
- Choose Your Caddy: Opt for a plastic or metal caddy that can withstand the elements.
- Select Your Herbs: Consider growing basil, mint, chives, or parsley for culinary use.
- Add Soil: Fill the caddy’s compartments with potting soil, ensuring good drainage.
- Position and Care: Hang or place your caddy in a sunny spot, watering your herbs as needed.
With this creative project, you’ll have fresh herbs right at your fingertips!
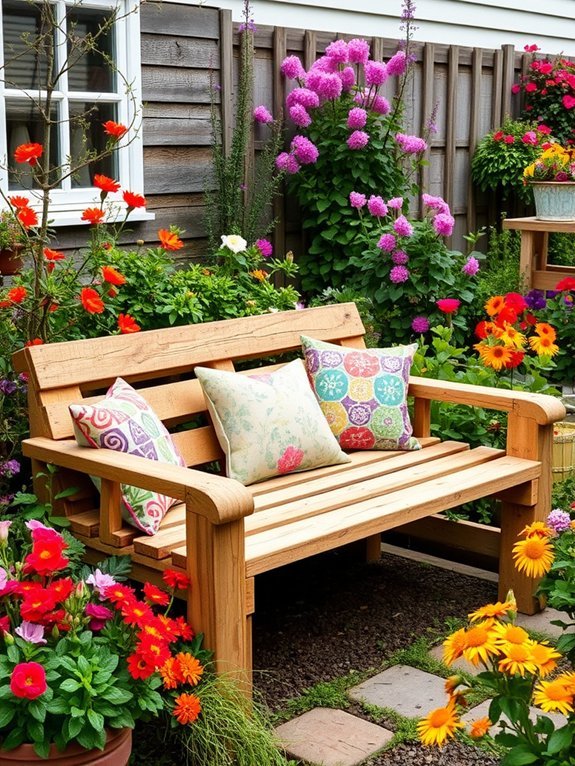
Upcycled Furniture Garden Seating
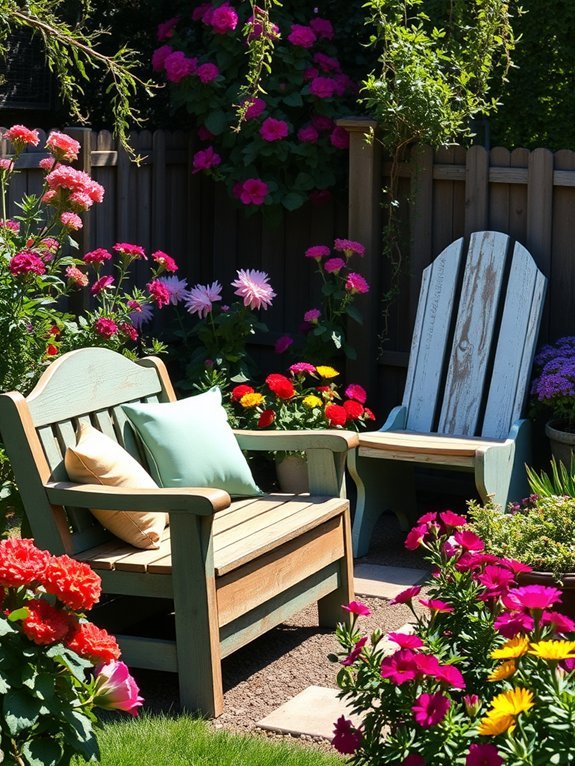
Upcycling furniture for garden seating can breathe new life into old pieces while enhancing your outdoor space. You don’t need to invest in brand-new furniture; instead, look around your home for items you can repurpose. Old chairs, benches, or even a couch can transform into cozy garden seating. A simple coat of weather-resistant paint can add color and protect your furniture from the elements. To make your seating more inviting, add cushions made from outdoor fabric or throw pillows for extra comfort. If you’ve got a mismatched collection, embrace the eclectic look; it adds character! Finally, consider combining various items for a unique seating area that encourages relaxation and enjoyment of your garden oasis.
Tin Can Herb Garden
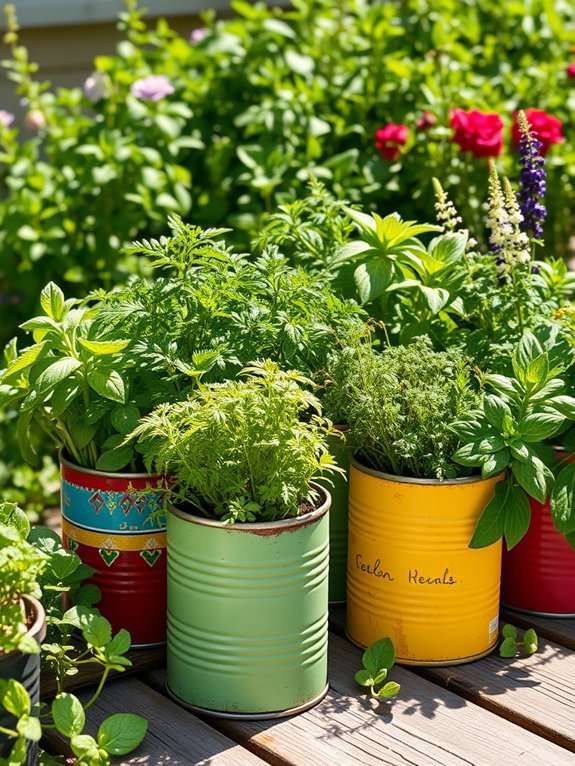
Instead of letting old tin cans pile up in the recycling bin, why not turn them into a charming herb garden? It’s easy and adds character to your outdoor space! Here’s how to get started:
- Gather your cans: Collect empty tin cans and rinse them out.
- Make drainage holes: Use a hammer and nail to punch holes in the bottom for water drainage.
- Paint or decorate: Give your cans a fresh look with non-toxic paint or decorations.
- Plant your herbs: Fill each can with potting soil, then plant your favorite herbs like basil, thyme, or mint.
In no time, you’ll have a delightful herb garden that’s both sustainable and stylish!
Scout for Salvaged Metal Art

While exploring thrift shops, flea markets, or even your own garage, you might stumble upon unique pieces of salvaged metal that can serve as fantastic outdoor art. These items can add character and a personal touch to your garden. Look for pieces to transform into sculptures, bird feeders, or decorative plant stakes.
Here’s a quick guide to help you identify great finds:
| Type of Metal Art | Potential Use | Considerations |
|---|---|---|
| Old Tools | Garden Sculptures | Shape and rust can add charm |
| Metal Cans | Planters or Decor | Guarantee drainage for plants |
| Scrap Metal Shapes | Garden Focal Points | Guarantee stability and safety |
Embrace creativity and turn these salvaged finds into stunning art pieces!
Concrete Block Fire Pit

Creating a concrete block fire pit can elevate your outdoor space, especially on chilly evenings. Not only is it practical, but it’s also an engaging DIY project. Here’s how you can make your own:
- Choose a Location: Find a flat area away from structures and overhanging branches.
- Gather Materials: You’ll need concrete blocks, gravel for drainage, and fire pit insert (optional).
- Build the Base: Lay gravel down to create a stable base. Arrange your concrete blocks in a circle, leaving gaps for airflow.
- Accessorize: Add seating around your fire pit and consider decorative stones or firewood storage for a cozy touch.
With just a few steps, you’ll have a stylish centerpiece for gatherings that invites warmth and conversation.
